
Snow Pusher or Shovel? Choosing Tools for a Toronto Driveway
A wide snow pusher and a smaller lifting shovel do different jobs. Choose around your driveway, steps and snow-storage space before choosing a model.

Choosing a snow tool starts with a simple question: where will the snow go? A driveway with room along both sides presents a different job from a narrow walkway, a flight of steps or a parking area with limited storage space. Before choosing a model, match the tool to those tasks. For many Toronto and Etobicoke properties, a pusher for open areas and a smaller shovel for lifting make a useful combination.
These are researched selections based on manufacturer specifications and the matching Amazon.ca listings, not hands-on product tests.
What a snow pusher does well
A pusher is designed primarily to move snow along the ground. Its broad blade helps gather a strip of snow as you move across a driveway or sidewalk. It suits a layout where you can keep pushing toward an available storage area without repeatedly lifting each load.
Width is a trade-off. A wider blade covers a larger strip, but it also collects more snow. That can be inconvenient on narrow paths or when snow is dense. Measure your tightest regular route, including gates and the space beside parked vehicles, before choosing a wide pusher.
Where a shovel earns its place
A shovel becomes useful when snow must be lifted, moved around an obstacle or placed beyond the end of a short path. A more compact blade is also easier to position on steps and around corners. If your property has several of these features, choose the lifting tool first and add a pusher if your open areas justify it.
Combination shovels can push and lift, making them an option when storage is limited. The compromise is that one blade may feel less convenient for either task than two tools chosen for specific jobs. Compare the shape and intended use, rather than assuming every wide shovel is a dedicated pusher.
Match the tool to the task
| Your regular task | Tool type to consider | Check before choosing |
|---|---|---|
| Moving snow across an open driveway | Snow pusher | Blade width and space to deposit snow |
| Clearing steps and tight corners | Compact shovel | Blade size and room to manoeuvre |
| Lifting snow over an existing pile | Lifting shovel | Tool weight and a comfortable grip |
| Mixed tasks with limited storage | Combination shovel | Whether its shape suits your main task |
A shovel to compare for your kit
This researched example covers the lifting side of the job. Choose a dedicated pusher separately if your open areas and snow-storage space suit one.
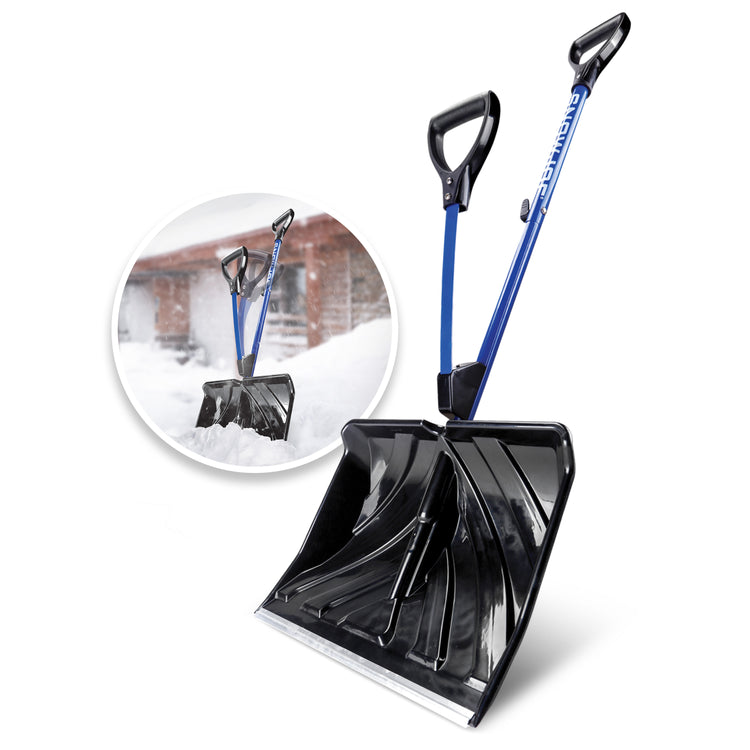
Snow Joe Shovelution SJ-SHLV01
This shovel combines an 18-inch poly blade with an aluminum wear strip and a secondary spring-assist handle. It is an option to compare when you want a lifting shovel alongside a separate pusher.
- 18-inch poly blade
- Aluminum wear strip
- Secondary spring-assist handle
When it may help: Consider it for steps, shorter paths and areas where snow needs lifting rather than a long, uninterrupted push.
Keep in mind: The extra handle gives it a different layout from a conventional shovel. Check that the grip arrangement suits you, and confirm the wear edge is appropriate for your surface.
I may earn a commission if you buy through this link.
Look beyond the blade width
Consider the complete tool: blade material, wear edge, handle length, grip and empty weight. A tool can look manageable in a photograph and still feel awkward at your height. If you can inspect one in person, check how the grip sits in your hands while wearing winter gloves.
Surface compatibility matters too. Decorative paving, decking and uneven joints deserve a closer look at the manufacturer's guidance for the blade and edge. Avoid assuming a particular material is suitable for every surface. Check whether replacement wear strips or handles are available if repairability matters to you.
Storage is another practical detail. Measure the space where the tool will live and make sure it is easy to reach when you need it. A very wide pusher may be useful outdoors but awkward beside a door or in a small shed.
Build a small kit around your property
Start by listing your regular areas: driveway, front walk, steps and side access. Mark which areas involve pushing and which involve lifting. Choose the tool that handles most of the work, then add a second only when it fills a clear gap.
Treat the product examples in this guide as options to compare against that list. Review the exact model, dimensions and current listing before ordering. A useful recommendation explains the task a tool suits and its limitations; it does not depend on one tool being right for every property.
Common questions
Can a snow pusher replace a shovel?
It may cover much of an open, straightforward area, but lifting, steps and tight corners can still call for a shovel. Look at the whole route you need to clear.
Should I choose the widest blade available?
Choose a width that fits your paths and the amount of snow you can comfortably move. Wider blades cover more ground but collect more snow in each pass.
Do I need two tools to get started?
Not necessarily. A combination shovel may suit a small property. Add a dedicated pusher when you have enough open space and regular pushing work to make it useful.
Sources and related reading
Product details reviewed 25 October 2026. Check the current listing and manufacturer instructions for the exact model before buying.